


As a Shopify store owner, you are always looking for new and better ways to increase your sales and conversions. This is possible with the Shopify discount app.
Offering discounts to your customers is a great way to promote your business. However, applying discounts manually can be time-consuming and boring.
That’s where the Shopify Automatic Discount app comes in!
This app applies discounts based on various criteria, such as order total, shipping destination, product type, and more.
Many automatic discount apps are available on the Shopify app store, so it can be hard to know which one to choose. That’s why we’ve built the best automatic discount apps for Shopify stores.
Keep reading to learn more about the best Shopify automatic discount app!
Importance of Offering Discounts:
When you are first starting with your Shopify store, it is important to offer discounts to your customers. This will encourage them to keep coming back and buying from you, and it will also help you attract new customers.
There are a few different ways to offer discounts, and we will explore some of them here.
One way to offer discounts is by using coupon codes. You can create unique codes for your products or special occasions like Black Friday and Cyber Monday, Mother’s Day, Father’s Day, Valentine’s Day, and many more.
Another way to offer discounts is by setting up sale prices on specific items. You can do this manually or use apps like AIOD – All Automatic Discount, which automatically sets sale prices for certain products during specified periods.
Finally, you can offer bulk discounts to customers who buy multiple items. This incentive can be especially effective if you are selling products that are complementary to each other.
Whatever method you use to offer discounts, it is important to ensure that they are easy for your customers to redeem. You should always include the discount code or sale price on the product page and clearly state the terms and conditions.
You can also display the discount on the cart page using automatic offers to increase average order value and conversion rate.
So, there is no confusion by using these methods. You can encourage more people to buy from your Shopify store and increase your sales.
Benefits of Using the Discount App Shopify
Here are some of the benefits of using the discount app Shopify:
- Increase your sales
- Increase your traffic
- Increase conversion rates
- Attract more customers
- Increase customer loyalty
1. Increase your sales: Offering discounts is one of the most effective ways to increase your sales on Shopify. With the discount app Shopify, you can easily create and manage your discounts and promotions.
2. Increase your traffic: By offering discounts, you can attract more traffic to your store and increase sales even further. People love getting a good deal and will visit your store specifically looking for discounted items.
3. Increase conversion rates: A higher conversion rate means more people are purchasing products from your store than before. Offering discounts can help increase your conversion rates and boost sales significantly.
4. Attract more customers: Discounts and promotions are a great way to attract new customers to your store. A discount app can help you reach a wider audience and bring more traffic to your store.
5. Increase customer loyalty: Offering discounts and promotions to your customers can help build customer loyalty. Customers are more likely to return to your store if they feel they are getting a good deal.
Just like in brick-and-mortar stores, shoppers online love getting good deals. To be successful in your Shopify business, it is important to offer discounts to attract visitors and convert them into buyers.
How to Provide Discounts in a Shopify Store?
If you want to provide discounts to your customers in a Shopify store, there are two ways you can do it.
1. The first way is to use a third-party discount app for the Shopify store. These apps allow you to create discount codes that your customers enter during the checkout process. Discount codes can be a fixed amount or a percentage off, and they can be limited to certain products or collections.
2. The second way to offer discounts is to use Shopify’s built-in feature. This allows you to mark down items by a certain amount or percentage, and the sale price will be applied at checkout. You can also create sale collections, which are groups of all discounted items.
The method you use should depend on your business needs and goals.
For example, if you want to offer a one-time discount to customers who sign up for your newsletter, using a discount code would be the best option.
If you want to run a sale on a specific collection of products, using Shopify’s built-in feature will be the easiest way to do it. And if you want to offer automatic discounts, wholesale discounts, BOGO discounts, post-purchase aftersell discounts, upselling and cross-selling discounts, you’ll need to use a third-party Shopify app.
Why use the Discount app Shopify?
Discounts are a great way to attract new customers and boost sales, but they can also be tricky to manage. That’s where discount apps come in. The Shopify discount app makes it easy to set up and manage discounts in your Shopify store.
You might want to use a discount app rather than Shopify’s built-in discount functionality for a few reasons.
For one, discount apps give you more control over your discounts. You can set up complex rules and restrictions, track them, and manage your discounts more easily.
The discount app often has more powerful features, such as creating a cart conditional discounts and automatic expiration dates.
So, the discount app is a great option for your store if you’re looking for an easy way to manage discounts in your Shopify store.
Which is the Best Discount app for Shopify Stores?
There are several discount apps for Shopify stores, but only some can offer the comprehensive range of features and benefits that Cirkle Studio’s AIOD – All Automatic Discounts app does.
Here are some of the main reasons why this app is the best discount app for Shopify stores:
- It’s Automatic: This discount app automatically applies discounts to products as they are added to the cart, so you don’t need to worry about applying them manually. This saves you time and hassle.
- It’s Comprehensive: This Shopify discount app offers a wide range of features and options, including automatic percentage discounts, quantity discounts, fixed price discounts, and more. This ensures that you can find the perfect discount solution for your store.
- It’s easy to use: This discount app is easy to use and configure, so you can start using it immediately without any complicated setup procedures.
If you want an AIOD – All Automatic Discounts app Shopify that can save you time and hassle, then look no further than this app!
Pricing and Plans:
The AIOD – All Automatic Discounts app Shopify has five different plans:
- Development Store Plan: Free
- Basic Shopify Plan: $9.99/month
- Shopify Plan: $14.99/month
- Advanced Shopify: $24.99/month
- Shopify Plus: $49.99/month
All the plans of this discount app Shopify, include the following:
- 30 days Free
- Create Unlimited Offers
- Create Unlimited Discount Codes
- Combine and Stack Discount Codes
- Create Different Types Of Discount Codes
- Upsell Pop-Ups
- No Extra or Hidden Charges
- Priority Support
We will elaborate on the features in the next section. The pricing and plans for this app are linked to your Shopify plan; i.e., if you upgrade your Shopify plan, you will also need to upgrade the discount app Shopify plan.
How to set up the AIOD – All Automatic Discounts app?
Here we’ll show you how to set up the AIOD – All Automatic Discounts app in your Shopify store. This discount app is a great way to automatically apply discounts to your customer’s orders, and it’s very easy to set up.
Follow the steps below, and the app will be up and running.
- Log in to your Shopify account and go to the “Apps” section.
- Search for “AIOD – All Automatic Discounts” and install the app.
- Once the app is installed, click on the “Settings” tab and configure the app according to your needs.
- That’s it! Your Shopify store is now set up to automatically apply discounts to your customers’ orders.
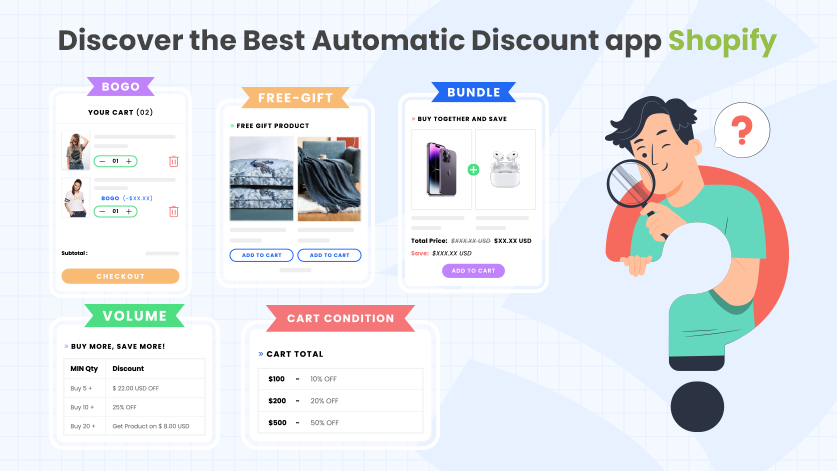
Types of Discounts in AIOD – All Automatic Discounts:
There are several types of discounts that this discount app Shopify, allows businesses to offer to their customers. Let’s take a look at each of these in more detail.
1. Bundle Discounts:
Bundle discounts are when businesses offer customers a discount for buying multiple items or services.
For example, a car dealership might offer a 10% discount to customers who purchase a car and an insurance policy from them. This discount can benefit customers, as it allows them to save money on multiple items.
Setting up a Bundle Discount:
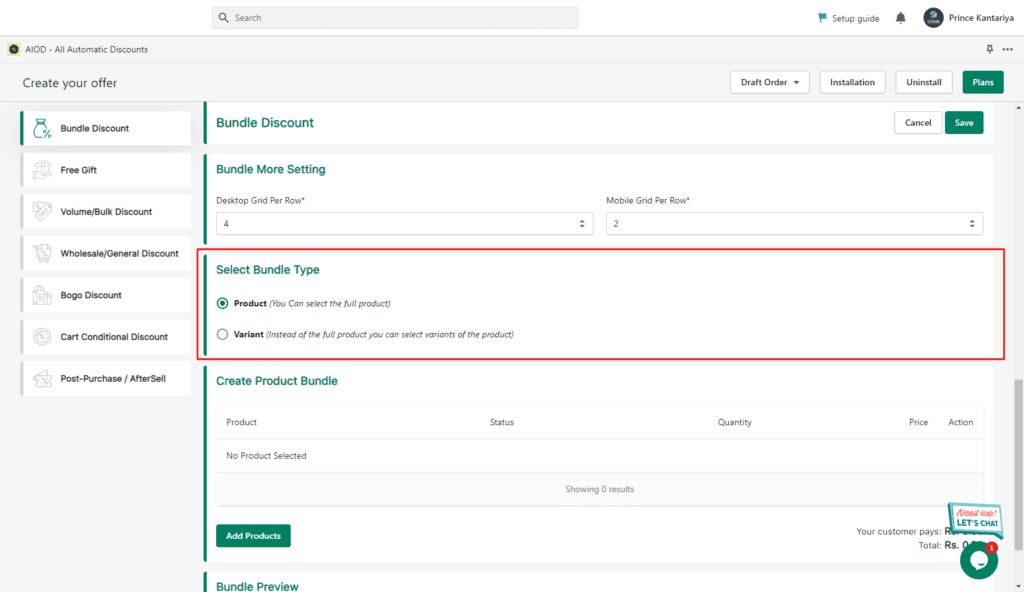
Step #1: Go to “Apps”, select “Offers”, select “Bundle Discount”, and then “Create Offer”.
Step #2: The next step is to “Select Discount Types”. There are two options to select from.
- Percentage Discount
- Fixed-Amount Discounts
Step #3: Now put in the details, such as bundle widget title, title, status, button text, short description, and schedule date.

Step #4: Next, “Set Priority” and “Bundle Type”. The bundle type can be decided based on the options like “Product” or “Variant”.
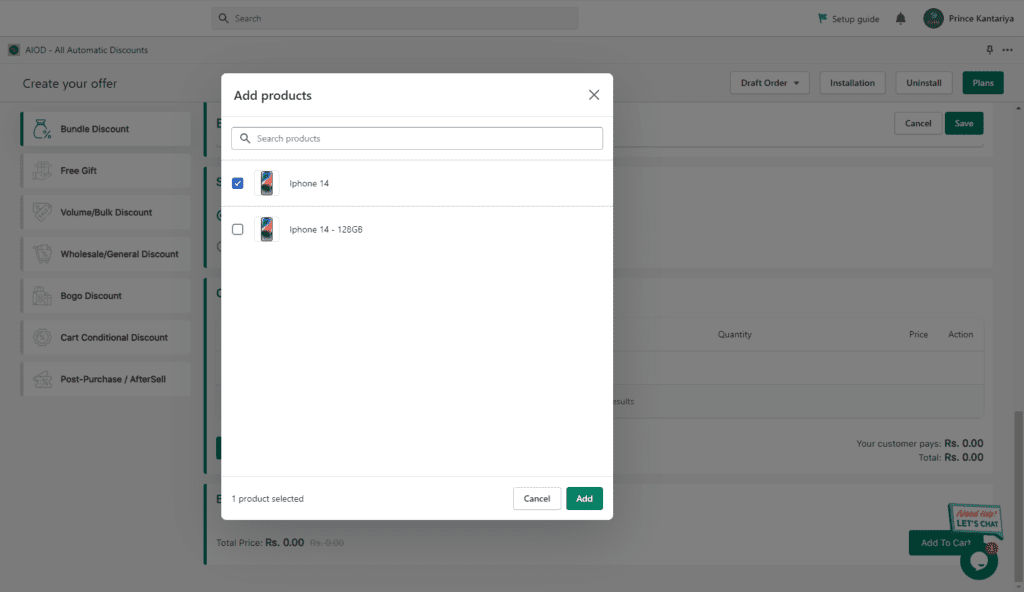
Step #5: For the fifth step, select the products you need in the bundle. This can be done by simply adding the products through “Add Products”.
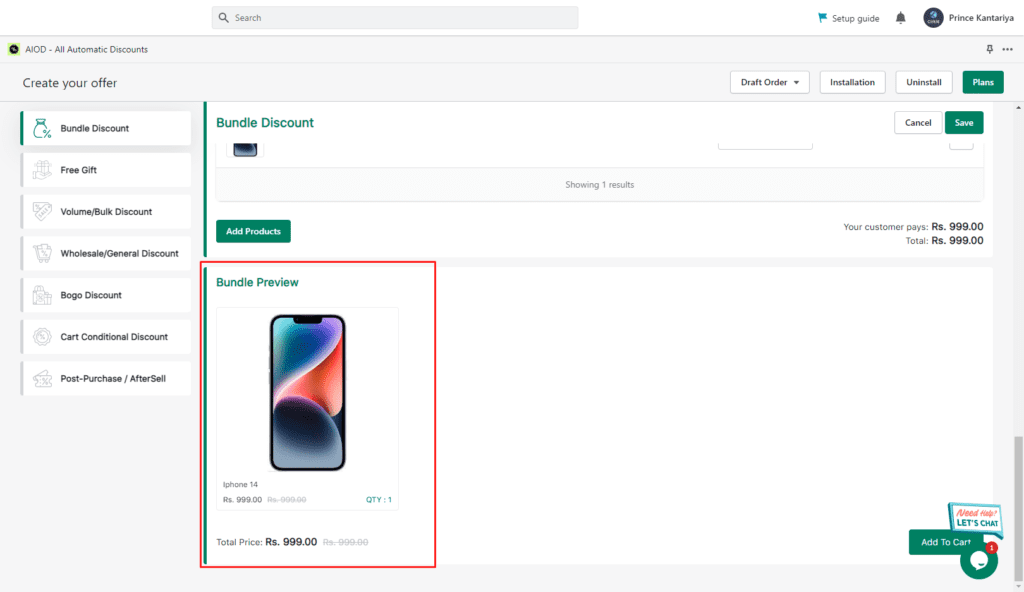
Step #6: After product selection, go through the preview and make changes if necessary. If not, then ready, set, and live.
For the Video Tutorial:
2. Volume Discounts:
Volume discounts are when businesses offer customers a lower price for purchasing larger quantities of products or services.
For example, a supermarket might give customers 30% off if they buy 3 packs of eggs instead of just 1 pack.
This type of discount is useful for both businesses and consumers, as it encourages people to buy more products at once and helps businesses sell more products.
Setting up a Volume Discount:
Step #1: Go to “Apps”, select “Offers”, select “Volume Discount”, and then “Create Offer”.
Step #2: Fill in the details, including the offer name, status, display table, and priority.
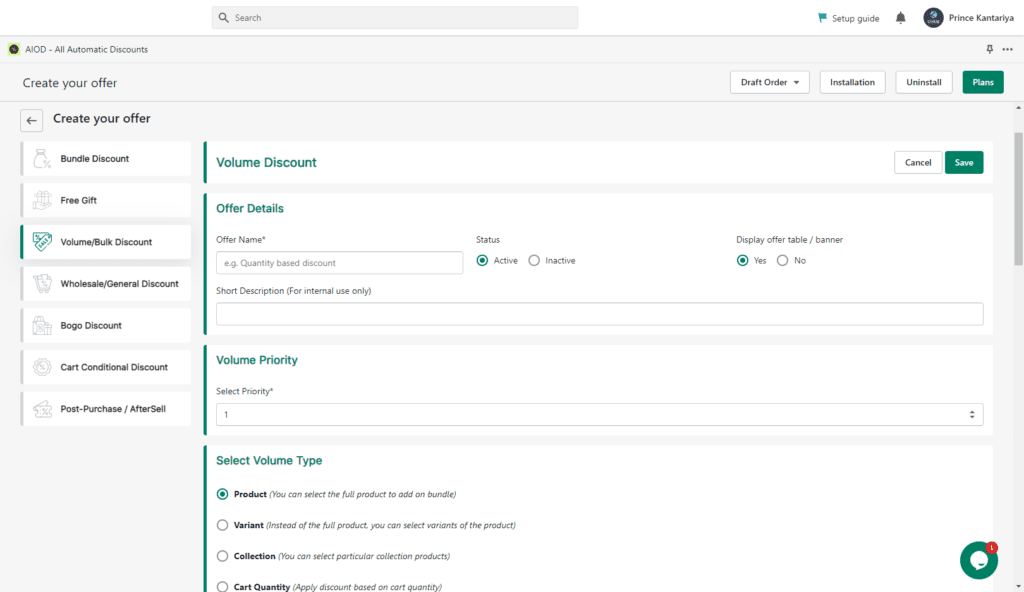
If a product is covered by multiple offers, you can decide which offer gets priority. You can, of course, do this by setting a priority.
Step #3: The next step is to set up the volume type. There are four options:
- Full Product
- Variant
- Collection (You can select multiple collections)
- Cart Quantity (Here, it is considered full cart quantity)
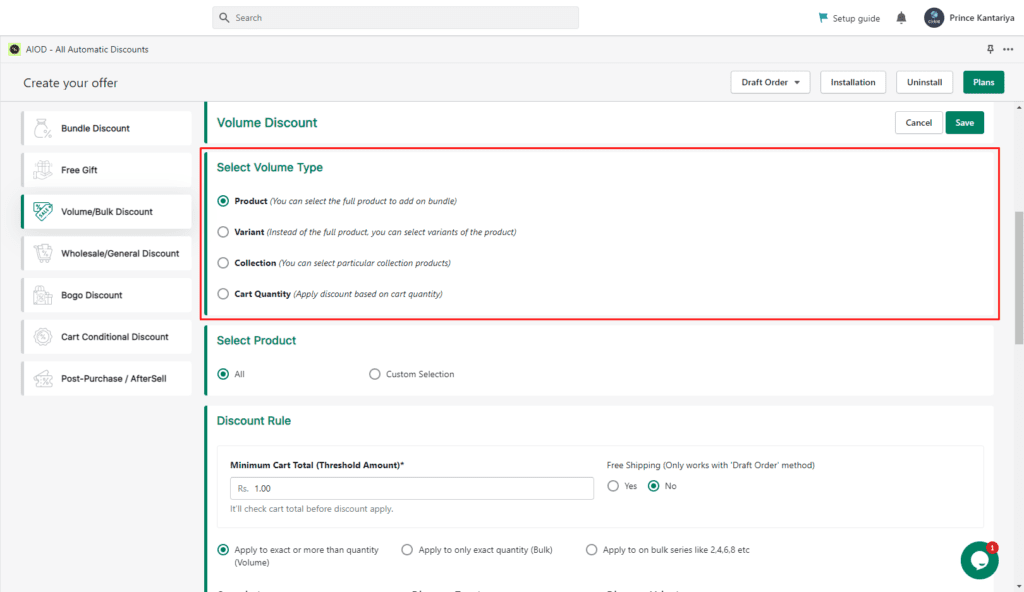
Note: You can choose your products manually or filter them based on your needs if you wish to choose a custom product.
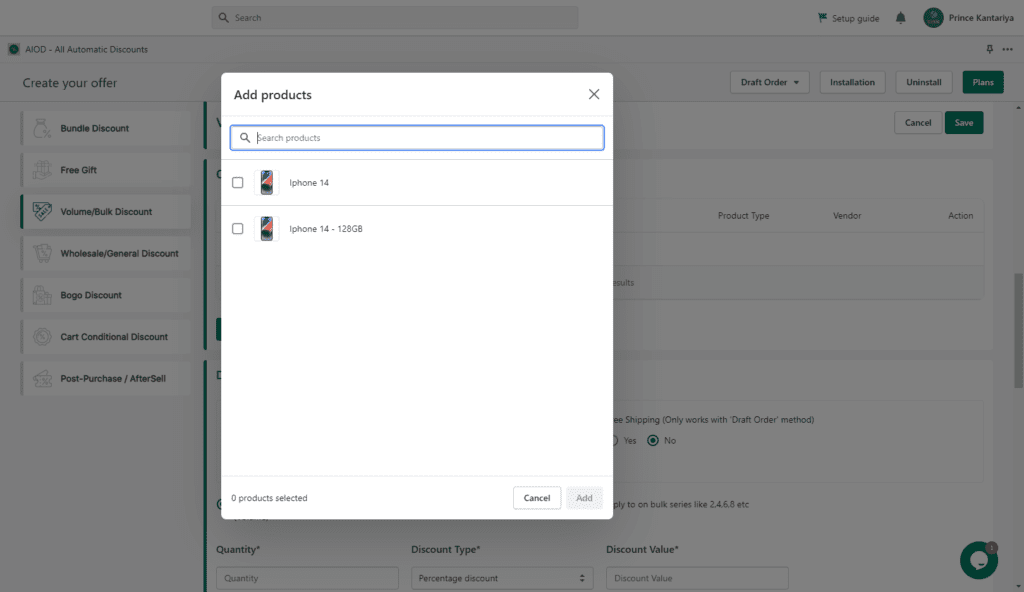
Step #4: Add products through the “Add Products” button.
Step #5: Next, set the “Discount Rule” for Volume Discount. There are three options to do so:
- USD (Price Discount)
- USD (Fixed Price)
- Percentage OFF
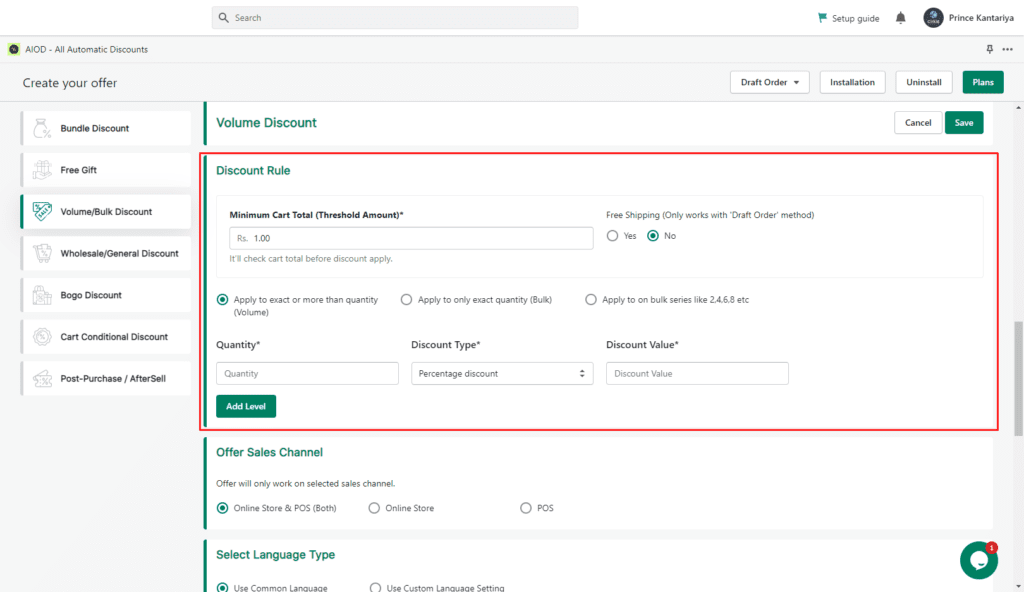
Step #6: Now put in the extra details, such as customer tags and the start and end dates.
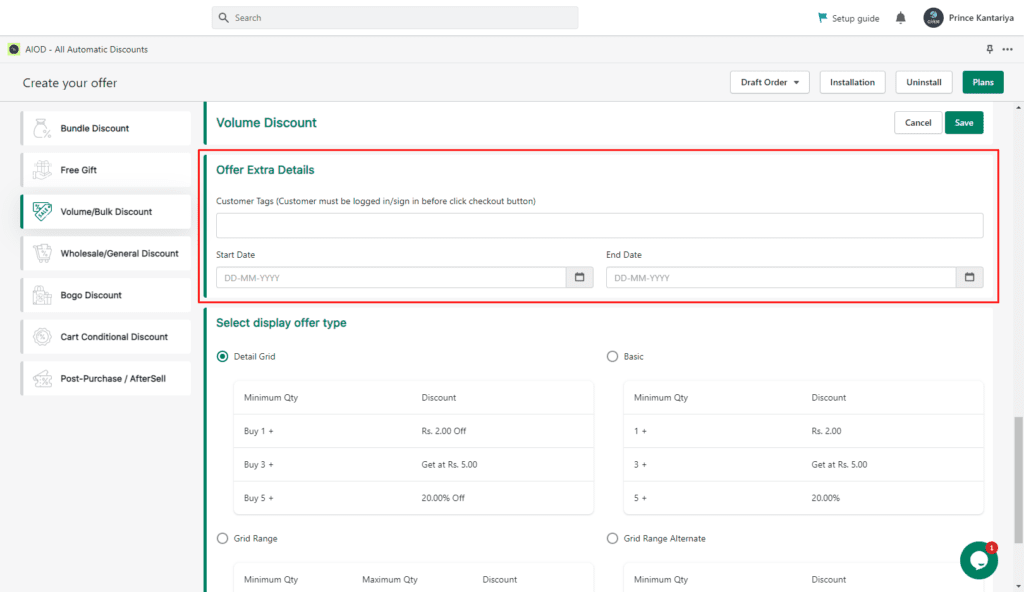
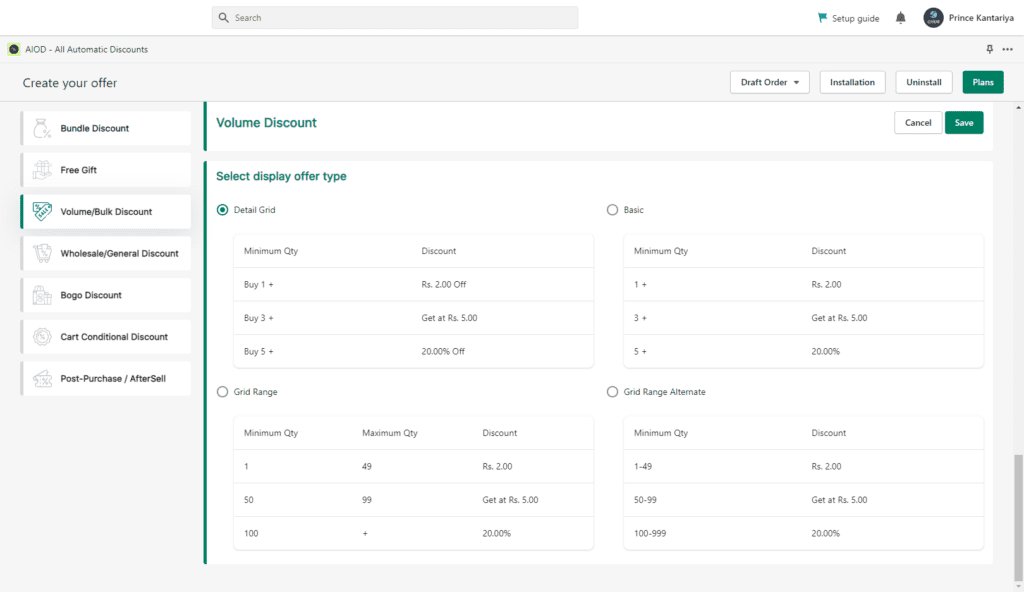
Step #7: Lastly, select the table options for your volume discount.
For the Video Tutorial:
3. Wholesale/General Discounts:
General or wholesale discounts are when businesses offer lower prices to all of their customers, regardless of how much they purchase.
This type of discount is typically used by businesses that sell large quantities of products or services.
For example, a computer company might offer 20% off all orders over $1,000.
Setting up a Wholesale Discount:
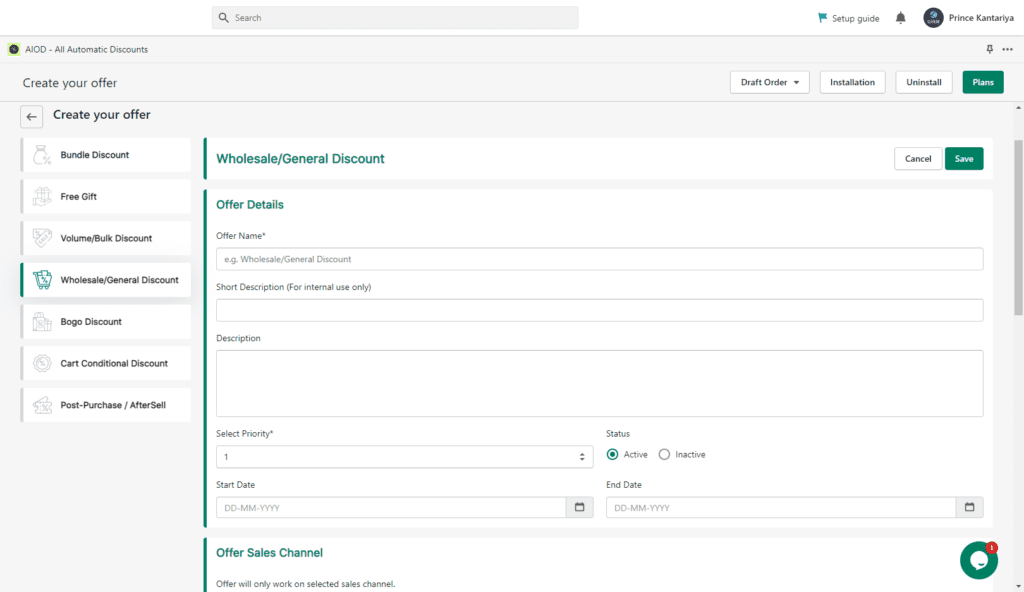
Step #1: Go to “Apps”, select “Offers”, select “Wholesale Discount”, and then “Create Offer”.
And add in the offer details, such as the offer name, description, priority, status, and schedule of the offer.
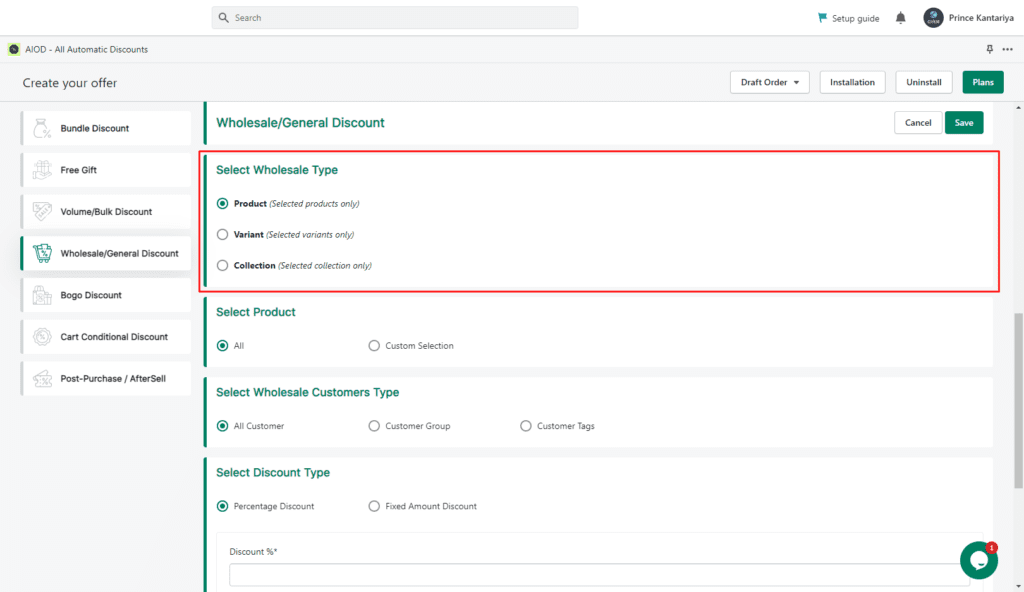
Step #2: The next step is to select the wholesale type. There are four options:
- Whole (Full) Website
- Product (Selected products only)
- Variant (Selected variants only)
- Collection (Selected collection only)
Next, you will need to select the wholesale customer type. There are three options:
- All Customer
- Customer Group
- Customer Tags
For the Video Tutorial:
4. Free Gift:
This is a marketing strategy to increase sales by offering a free product with the purchase of another product.
For example, a clothing store might offer a free pair of socks with the purchase of a pair of pants.
This type of discount is beneficial to businesses because it can increase sales, and it is also beneficial to customers because they receive a free product.
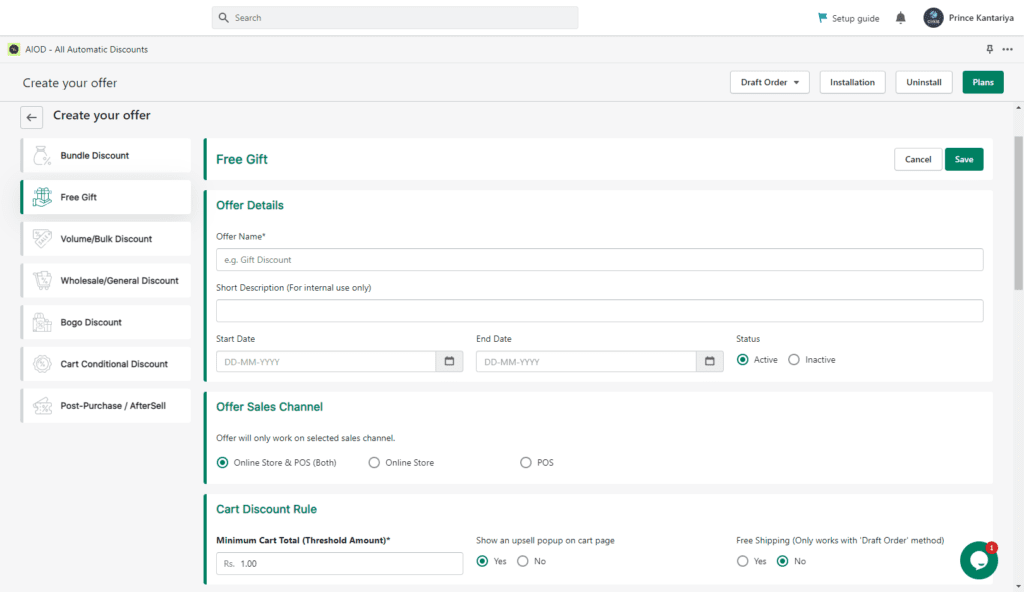
Setting Up a Free Gift Discount:
Step #1: Go to “Apps”, select “Offers”, select “Free Gift”, and then “Create Offer”. The next step is to enter the offer details, like the offer name, start date, end date, and status.
Step #2: The next step is to decide on the minimum cart total (threshold amount).
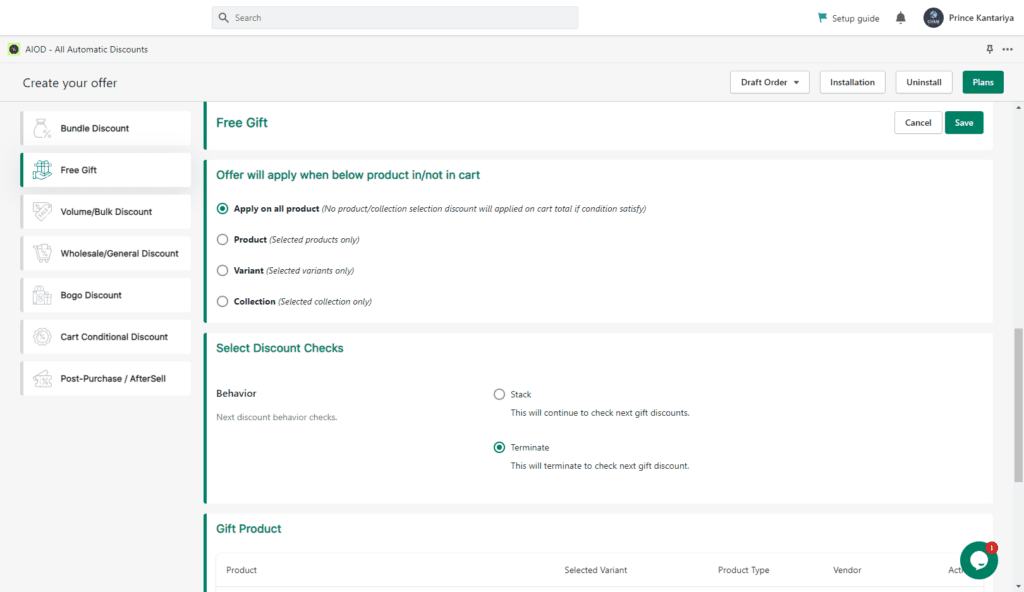
Step #3: Next, you will select the product to trigger the discount. You will do so by choosing an option (out of four) from the “Offer will apply when the below product is in or not in the cart”.
- Select all products of the store
- Select a particular product
- Select a particular variable
- Select a particular collection
Step #4: The fourth step is to set up discount checks. Go to Select Discount Checks and select from the following options:
- Stack: If a user already has one free gift on the cart page, then it will show the next eligible free gift offer.
- Terminate: If the user already has one free gift on the cart page, then it will not show the next eligible free gift offer.
Step #5: The next step is to select the gift product. The conditions allow for the inclusion of multiple product variants as free gifts.
To do so, simply click on add products and select the products or variants that you want to set as the free gift.
The selected products will now show up in the free gift popup on the cart page when the customer is pursuing through.
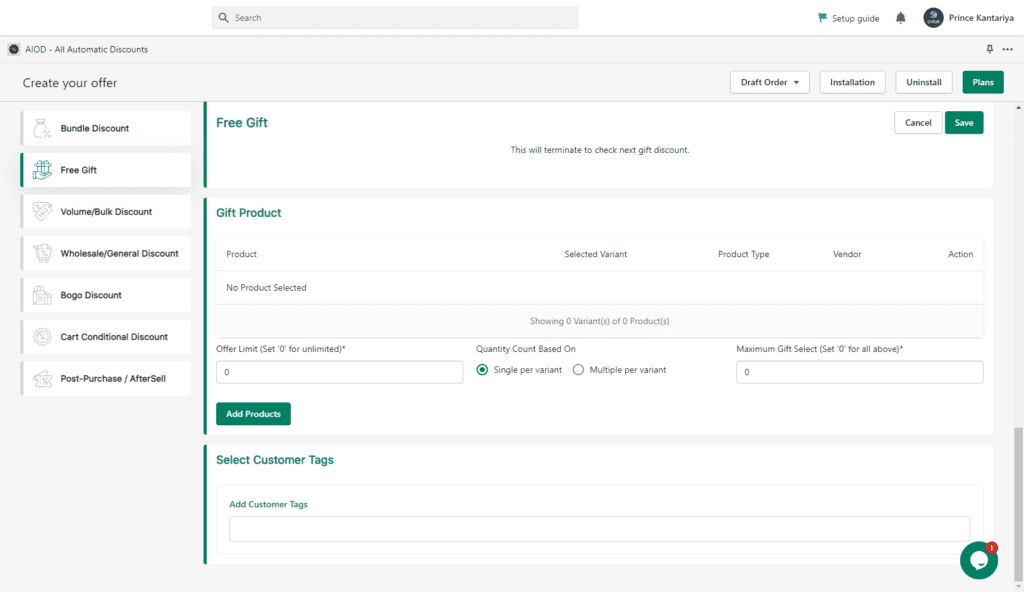
Note: The maximum gift selection limit will automatically adjust to the number of variants available.

Step #6: You will also need to set the quantity count based on the following options:
- Single per Variant: This means it will count only one quantity per Variant as a free gift
- Multiple per Variant: This means it can count the maximum gift quantity per variable as a free gift.
Step #7: Next, you must put in the details such as Offer Limit (0=unlimited) and customer tags. And the setup process is done.
For the Video Tutorial:
5. BOGO Discounts:
BOGO stands for “Buy One, Get One”, and it is a type of discount where businesses offer customers the opportunity to buy one product and get another product for free.
For example, a shoe store might offer a BOGO discount where customers can buy one pair of shoes and get a second pair for free.
This type of discount is beneficial to businesses because it can increase sales, and it is also beneficial to customers because they get two products for the price of one.
Setting up a BOGO Discount:
Step #1: Go to “Apps”, select “Offers”, select “BOGO Discount”, and then “Create Offer”. Next, fill in the offer details, including the offer name, select priority, and status.
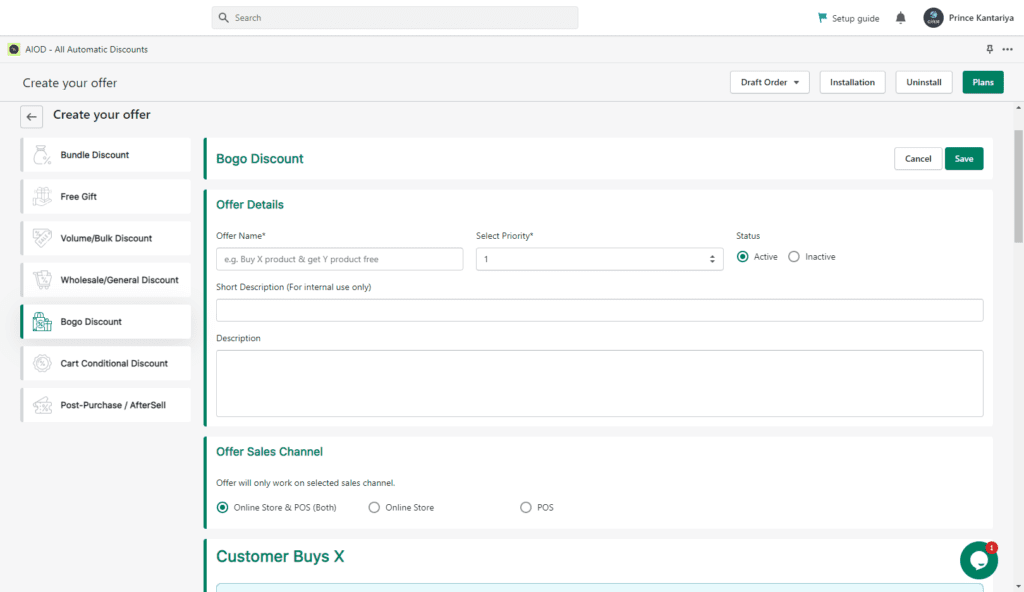
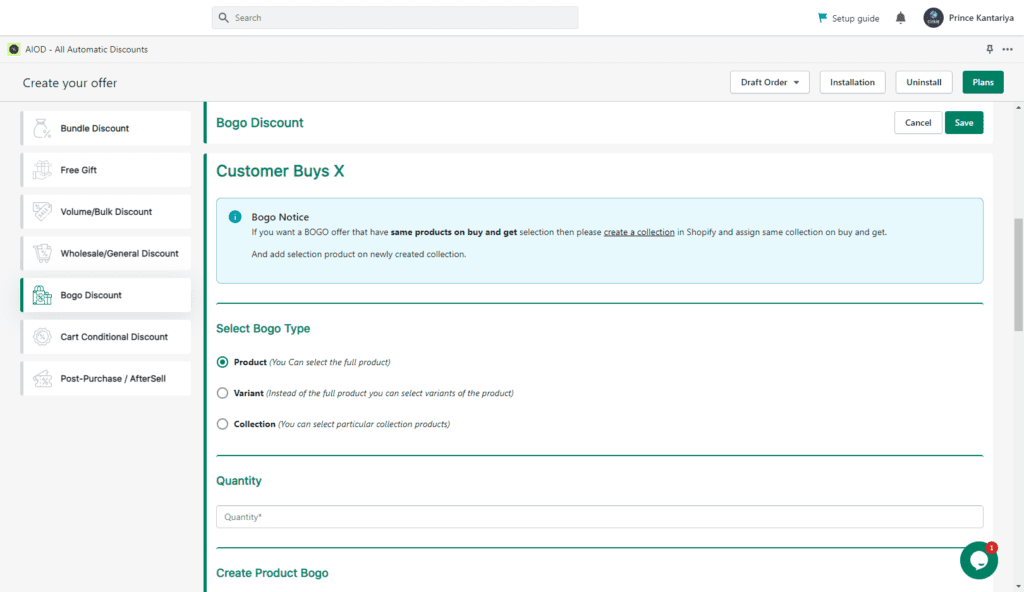
Step #2: Now, you need to set up the Customer Buys X section. This will mean you will be setting up the products that your customer must buy to trigger the discount.
Here you will need to select BOGO Types; the options are as follows:
- Select particular product
- Select particular variable
- Select particular collection
Next, you will need to add in quantity, i.e., the number of products your customer needs to buy, to trigger the discount. You can add it manually or through the arrows.
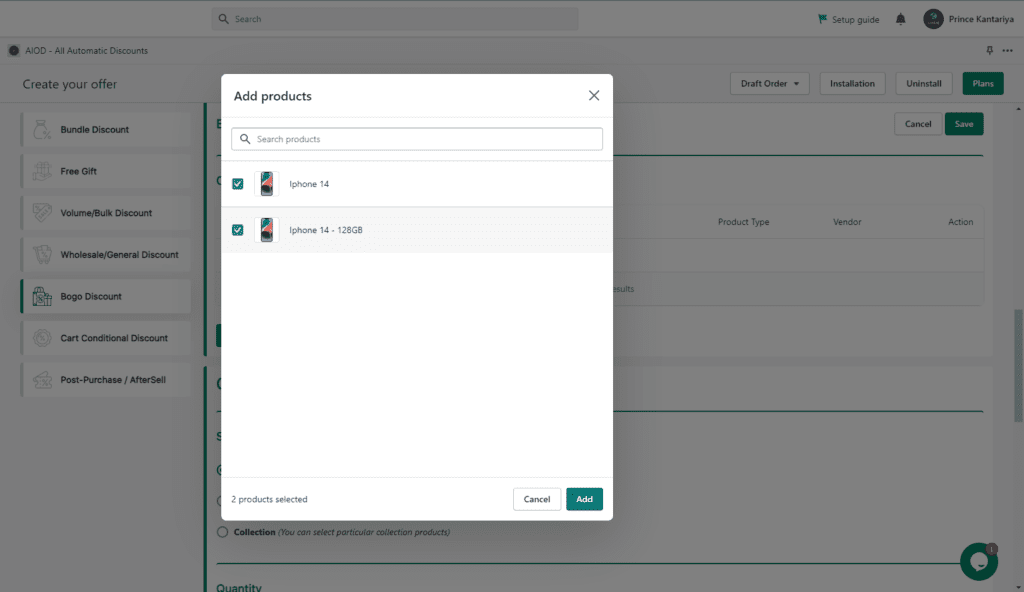
Step #3: The next step is to set up the create product for the BOGO option.
Here you will add in the products, which can be done through a simple Add Products.
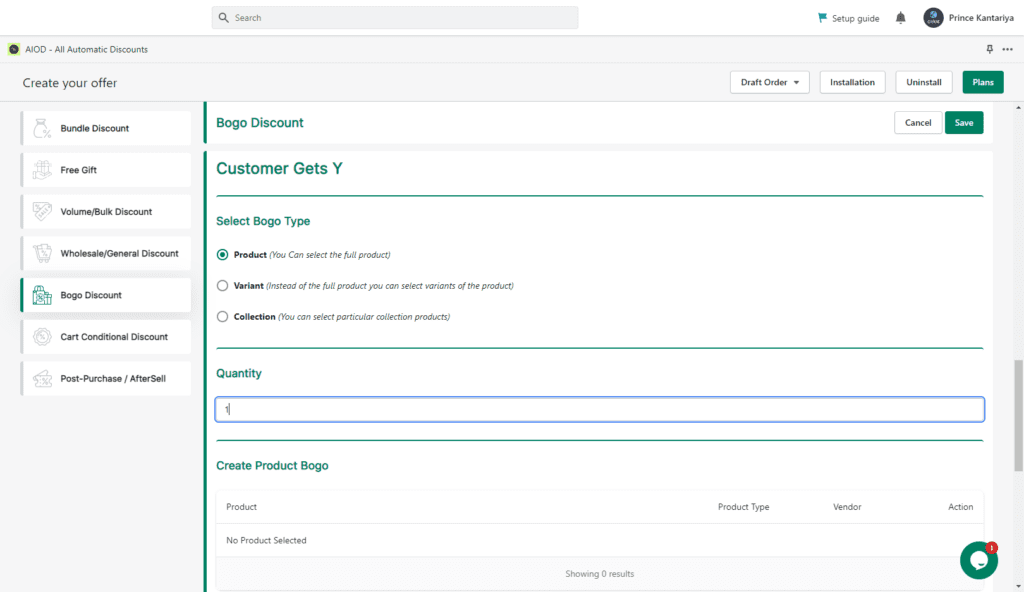
Step #4: Now you will need to set up the Customer Gets Y.
This again has three options:
- Select a particular product
- Select a particular variable
- Select a particular collection
Next, set up the quantity. And add in the products.

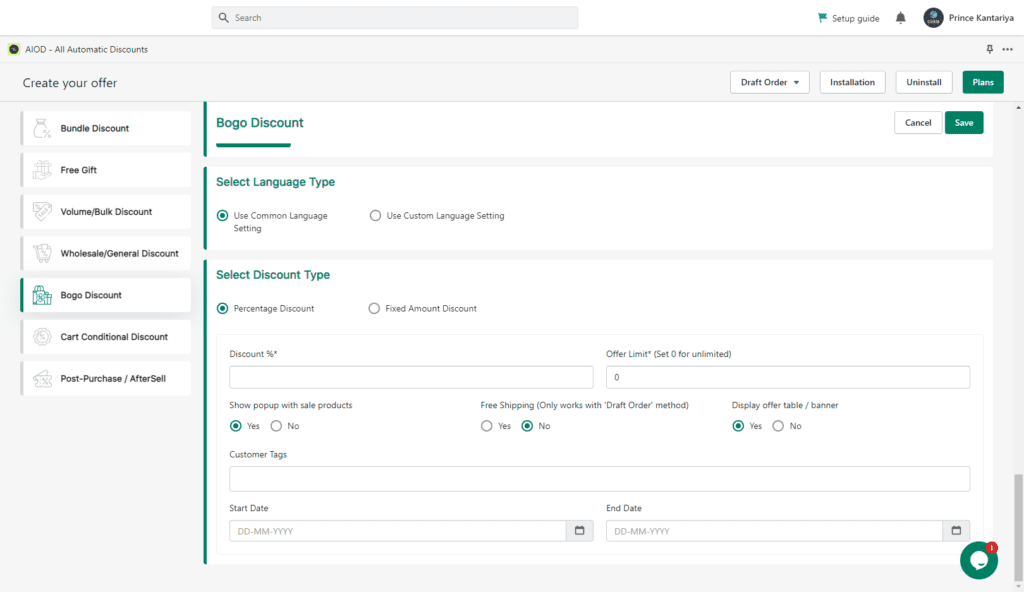
Step #4: Now select settings types.
There are two options:
- Use Common Language Setting: This will be used as a top bar text from the language setting (this will be common for all BOGO offers).
- Use Custom Language Setting: This will be used as a top bar for different text for each offer.
Next select discount type (% or fixed amount), offer limit, and show a popup on the cart page with sale products, customer tags, and schedule date. And your discount setup is done.
For the Video Tutorial:
6. Cart Conditional:
Cart conditional discounts are when businesses offer customers a discount based on the items that are in their shopping cart.
For example, a furniture store might offer a 10% discount to customers who purchase a sofa and a coffee table.
This type of discount is beneficial to businesses because it can encourage customers to buy more items, and it is also beneficial to customers because they can save money on the items they purchase.
Setting Up a Cart Conditional Discount:
Step #1: Go to “Apps”, select “Offers”, and then select “Cart Conditional Discount” and then “Create Offer”. Next, fill in the details, such as the offer name, start date, end date, and status.

The next part is to set the discounted product. You will need to set up the “Offer will apply when the below product is in or not in the cart” option. There are four options:
- Select all products of the store
- Select a particular product
- Select a particular variable
- Select a particular collection
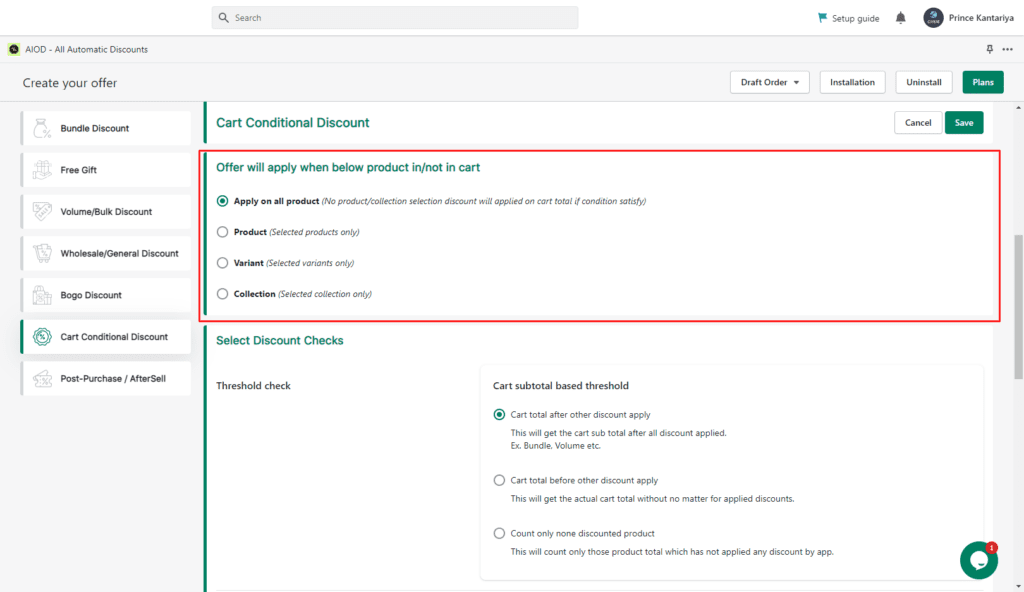
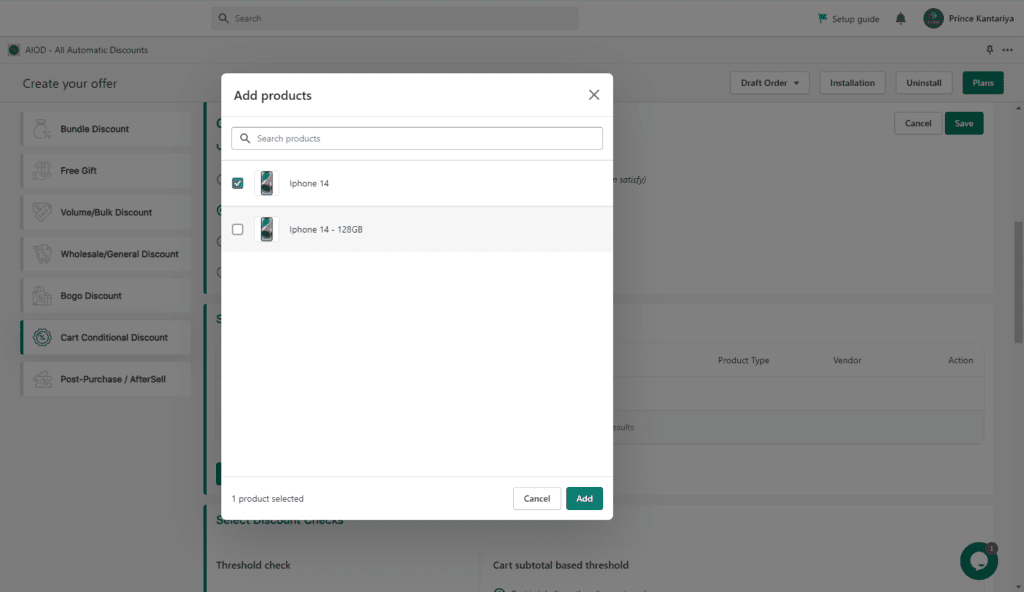
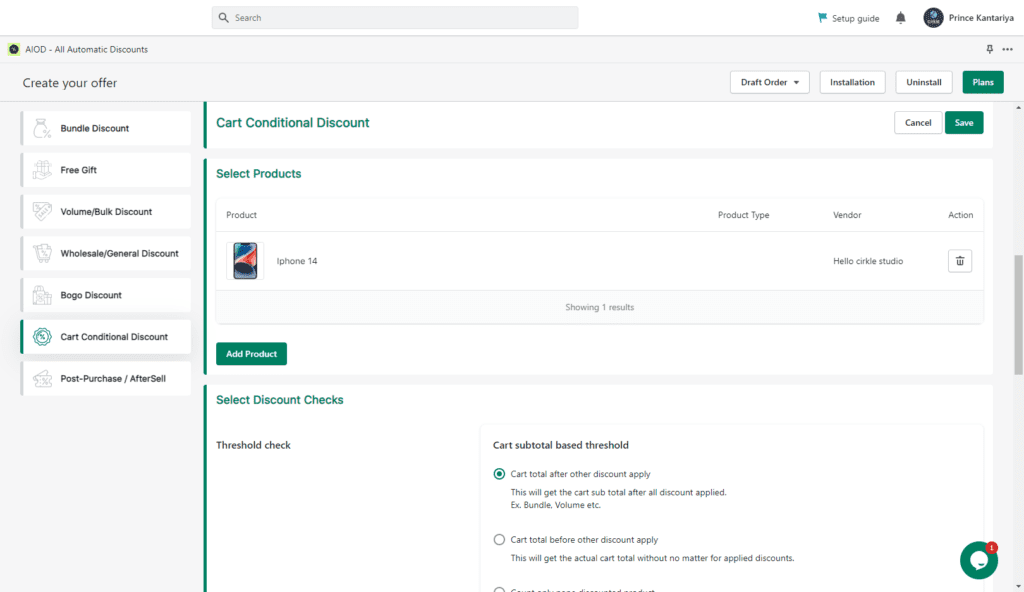
You can add the product by simply clicking on “Add Product” and then selecting it.
After making your pick, you can view the preview here.
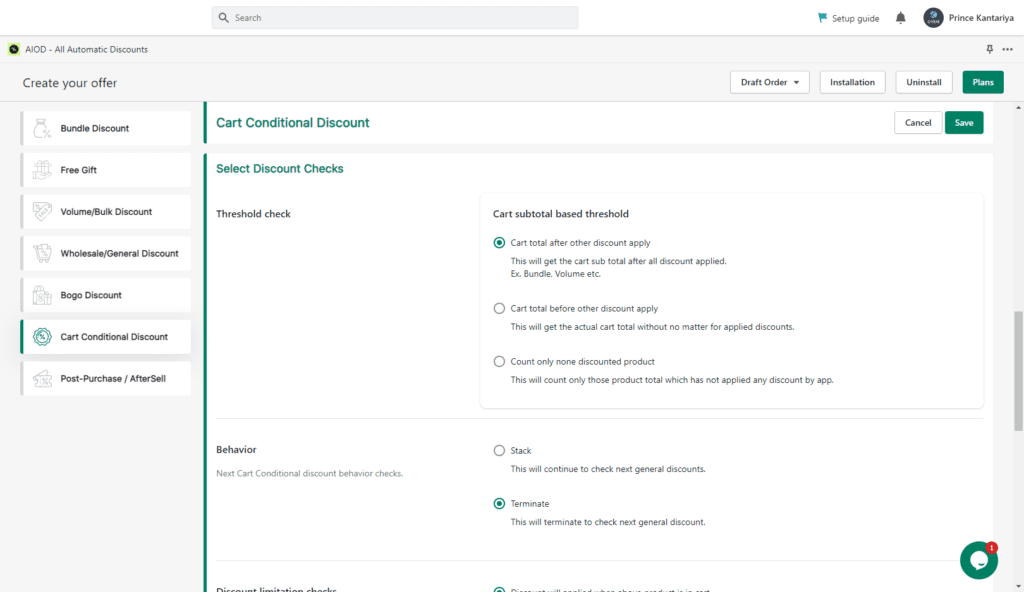
Step #2: The next step is to “Select Discount Checks”. Here, you will need to set up the following three categories:
Cart Total (Threshold) Check:
- Cart total after other discounts apply
- Cart total before other discounts apply
- Count only, no discounted Products
Behavior:
- Stack: If the user already gets one conditional cart discount on the cart page, then it will show the next eligible conditional cart discount offer.
- Terminate: If the user already gets one conditional cart discount on the cart page, then it does not show the next eligible conditional cart discount.
Discount limitation checks:
- A discount will be applied when the above Product is in the cart
- A discount will be applied when the above Product is not in the cart
Step #3: Now you need to select customer tags and select the discount type (% or fixed). Add in the discount or maximum discount value.
Step #4: The next part is to set up the Cart Discount Rule (Any Condition or All Conditions). Followed by setting up the details like minimum cart quantity and minimum cart total (threshold amount). And the process of setting up your cart’s conditional discount is done.
For the Video Tutorial:
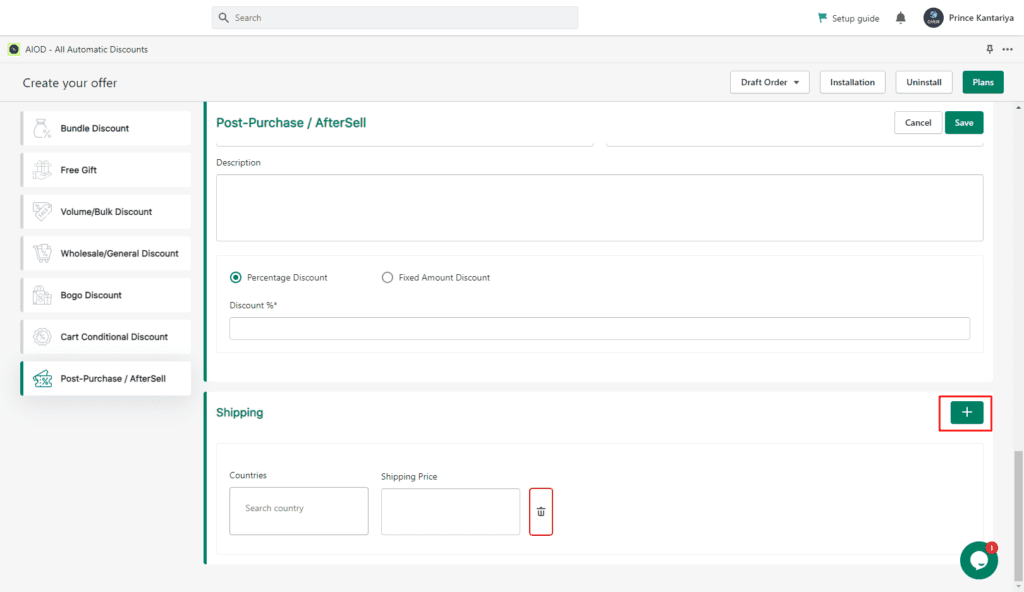
7. Post-Purchase Aftersell Discounts:
Post-purchase discounts are when businesses offer customers a discount after they have made a purchase.
For example, a store might offer a 10% discount to customers who spend more than $100.
This type of discount is beneficial to businesses because it can encourage customers to spend more money at the store, and it is also beneficial to customers because they can save money on their purchases.
Setting Up Post-Purchase Aftersell Discount:
Step #1: Go to “Apps”, select “Offers”, then select “Post-Purchase Aftersell Discount”, and then “Create Offer”. Then add offer details such as start date, end date, and status, and select priority.
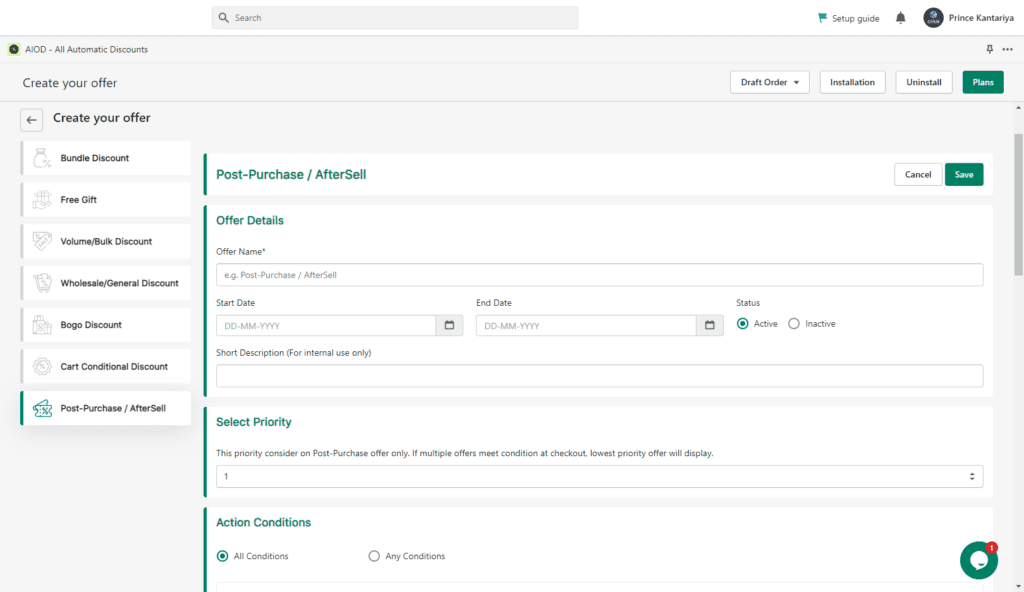
Step #2: The next step is to put in the action conditions. There are two conditions:
- All Conditions
- Any Conditions
Step #3: After setting up the action condition, we will have to put in the cart total condition and product condition.
First, let’s talk about the cart’s total condition. This requires you to put in the Minimum Cart Total (Threshold Amount)*. This will determine the minimum amount your customer needs to spend to trigger the discount.
For the product condition, you will need to choose from the following options:
- Apply when any item is in the cart
- Apply when the specific item is in the cart
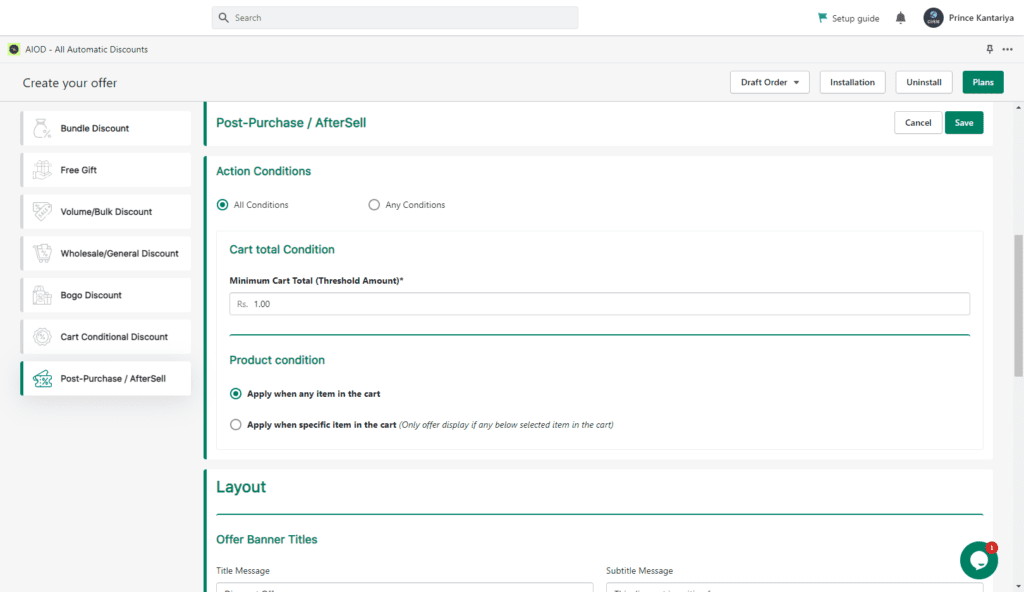
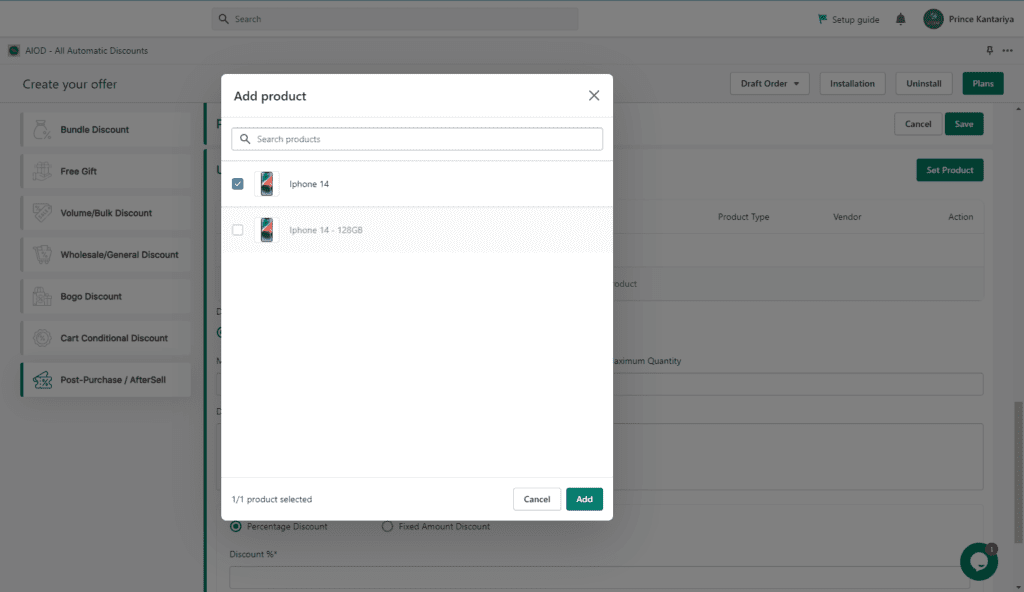
Step #4: Next, we will select products. To do so, simply click on Add Products and select the products of your choice.
Step #5: For this step, we will put in the details, which include “Select Offer Banner” Titles (Title Message, Subtitle Message), Select Offer Countdown, Timer in Minutes, Message, and After Time Finish.
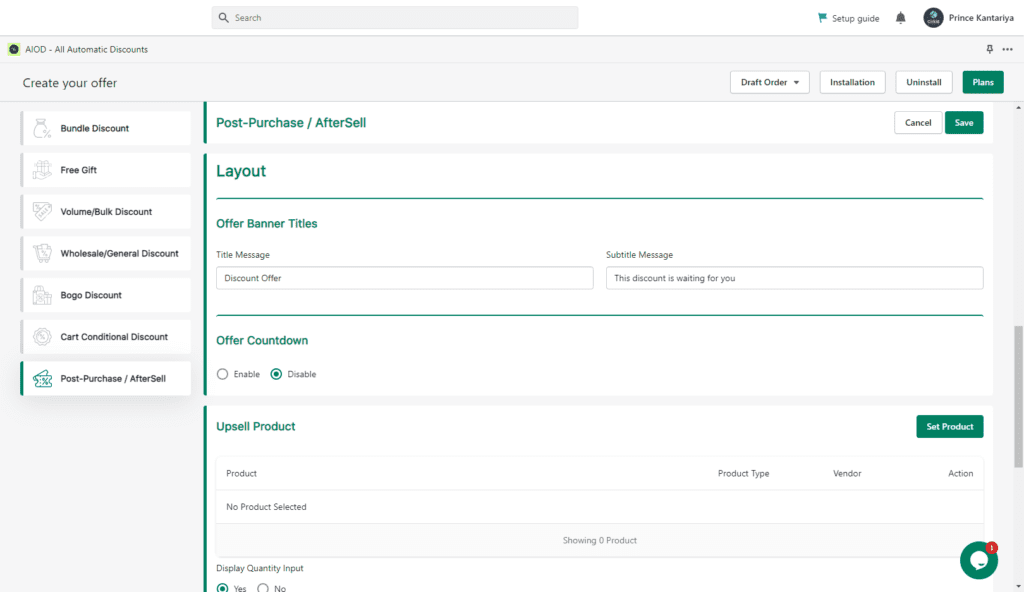
Step #6: Now put in the details for the upselling product. The details include display quantity input, description, and discount (% or fixed amount).
Step #7: Last but not least, put in the shipping details, like countries and shipping prices.
For the Video Tutorial:
Stack Code with Multiple Discounts:
You can often save even more money by “stacking” multiple discounts on one purchase.
For example: You might be able to stack a 10% off coupon with a 20% off sale and/or a free shipping code.
This type of discount is beneficial to businesses because it can encourage customers to spend more money at the store, and it is also beneficial to customers because they can save money on their purchases.
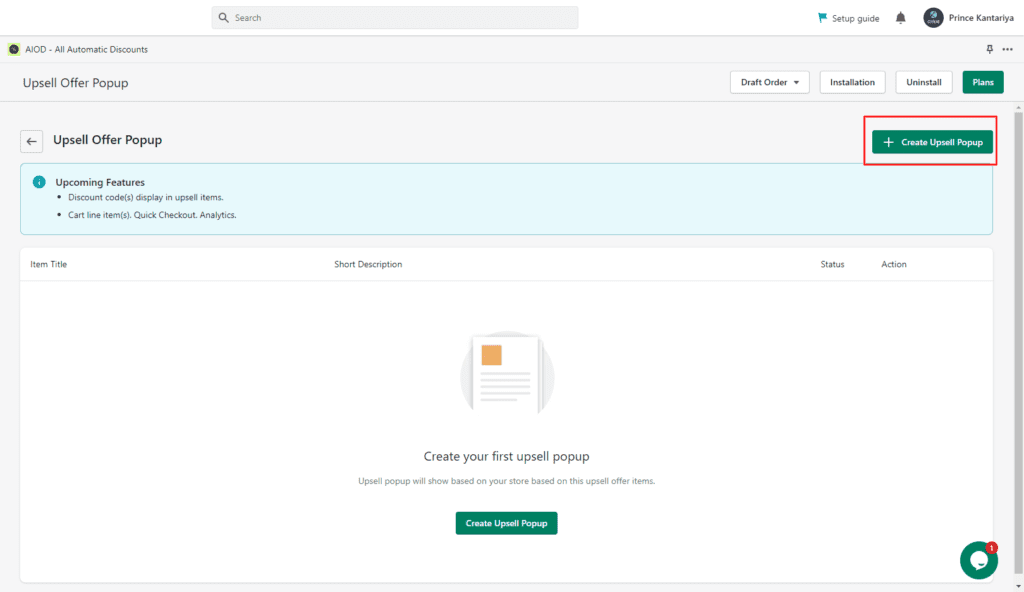
Upsell and Cross-sell Discounts:
This Shopify discount app allows you to upselling and cross-selling discount popups. Automatically offer order bumps, shipping upgrades, and more to your Shopify customers at checkout.
You can set up rules to offer discounts on products, collections, pages, blog posts, and even the entire store!
Priority Support:
Support is very important to this discount app Shopify, and they want to make sure that their customers are taken care of. They offer priority support to all of their customers so that they can get the help they need as quickly as possible.
They are also available 24/7 through chat to answer any questions you may have.
Conclusion:
The AIOD – All Automatic Discounts Shopify app is the best automatic discount app for the Shopify store. It offers a comprehensive set of features that allow store owners to automatically offer discounts to their customers.
This app is easy to set up and use, and it offers a wide range of customization options.
If you have any further questions, feel free to contact us or comment below.